
Every dental restoration leaves the mill or printer unfinished. A zirconia crown comes out monochromatic. A printed resin crown comes out in a single flat shade — nowhere near the layered color the eye expects from a real tooth, and not enough to meet aesthetic demands. What turns either one into something that passes for a tooth is staining — and here is where many labs make an expensive mistake: reaching for the wrong kind of stain.
There are two fundamentally different stain chemistries in dental technology. They look similar in the jar. They do completely different things. This article goes deep on both: the chemistry underneath, how each system evolved, where each one wins, and how to never confuse them again.
Where staining came from
Dental staining is older than most technicians realize. In the porcelain-fused-to-metal era, characterization meant hand-mixing metal oxide powders — iron for yellows and browns, cobalt for blues, titanium for opacity — into a porcelain medium, then firing. Every lab had its own recipes. Results depended entirely on the ceramist’s eye and the furnace’s mood.
Two things changed this. First, the substrate landscape exploded: zirconia, lithium disilicate, milled PMMA, printed resins, PEEK — materials the old porcelain technicians never imagined. Second, manufacturers started engineering stain systems instead of selling loose pigments: matched shade palettes, controlled particle sizes, validated firing curves, purpose-built glazes and thinners.
Today’s resin stains and low-fusing ceramic stains are the two mature answers to that evolution — each optimized for one half of the modern substrate world.
The core distinction: cure vs. fire
All dental stains add color and characterization to a restoration surface. But the way they become permanent splits the field in two:
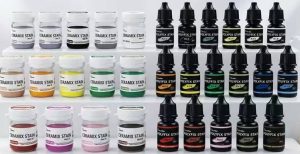
- Resin stains(light-cure stains, e.g. Polyfix) harden under light. No furnace. The chemistry is related to dental composites — pigments suspended in a light-curable resin matrix.
- Low-fusing ceramic stains(e.g. Ceramix) harden in a furnace. The chemistry is glass — finely ground ceramic pigments that melt and fuse to the substrate at relatively low temperatures.
This single difference — light vs. heat — determines everything: which substrates each works on, what equipment you need, how long the process takes, and what happens if you mix them up.
Part 1: Resin stains — color without heat
The chemistry underneath
A resin stain is a photoinitiated polymer system. The stain paste contains monomers (similar to those in dental composites), a photoinitiator package, and inorganic pigments ground fine enough to stay suspended. When you hit it with the right wavelength of light, the photoinitiators generate free radicals, the monomers crosslink, and the liquid paste becomes a solid polymer skin — in seconds.
This matters for two reasons. First, the cure is on demand: nothing happens until you shine the light, so working time is effectively unlimited. You can take ten minutes perfecting a mamelon effect without the material setting on you. Second, the cured layer is chemically related to the substrate it’s sitting on (printed resin, PMMA, composite) — polymer bonding to polymer, which is why adhesion is reliable without aggressive surface treatment.
How they work in practice
You brush or layer the stain onto the restoration surface, then polymerize with a standard dental curing light or curing unit. Because there is no firing step, the substrate never sees high temperature. That is the entire point: resin stains exist for materials that cannot go into a furnace.
What they’re for
Resin stains are the system for polymer-based restorations:
- 3D-printed resin crowns and bridges— the fastest-growing application as printed permanent restorations move into real clinical use
- PMMA temporaries— characterization of milled or printed provisional restorations
- PEEK frameworks— high-performance polymer substructures that need aesthetic layering
- Traditional composite and acrylic work— direct and indirect composite restorations
- Clear aligner finishing— gloss and transparency maintenance with soft glaze systems
If the restoration is plastic, the stain must be plastic-compatible. That means light-cure.
The layering philosophy: thin is strong
The single most important technique principle with resin stains is stratification — building color in multiple thin layers rather than one thick one. This isn’t just aesthetics; it’s physics:
- Thin layers cure completely.Light penetration drops with thickness. A thick layer risks under-cured material at the bottom — soft, leachable, and prone to discoloration. Multiple thin layers, each fully cured, are mechanically superior.
- Thin layers look like teeth.Natural tooth color is itself stratified — dentin body, enamel overlay, incisal translucency. Mimicking that structure layer by layer produces depth that a single opaque coat cannot.
- Thin layers are correctable.Each cured layer is a checkpoint. If the cervical chroma is wrong after layer two, you adjust layer three — you don’t start over.
This is why a proper resin stain system includes a thinner (R19): viscosity control is what makes micro-layering possible. Fine crack lines, perikymata texture, subtle cervical blending — all of it depends on being able to thin the stain without shifting its shade.
The Polyfix system in detail
Polyfix is built around 18 base shades (R01–R18), covering the full characterization palette: gingival reds and pinks, cervical sepias and bronzes, incisal blues, grays and opalescent effects, mamelon yellows, fissure blacks and browns, plus white for enamel spots and value adjustment.
The full 21-piece set adds three functional components that matter more than most technicians realize:
- R19 Thinner— controls viscosity without shifting the shade. Critical for fine line work and even large-area glazing.
- R20 Transparent Glaze— the protective topcoat. Seals the stain layer, adds gloss, provides wear resistance. Without it, stain layers are vulnerable to toothbrush abrasion and chemical attack. The five minutes for the glaze coat is the cheapest insurance in the workflow.
- R21 Soft Glaze— a flexible variant engineered for applications where the surface needs to stay thin and forgiving. Its signature use is clear aligner finishing: after printing, washing, and a 1-minute cure, the aligner is brushed with soft glaze and cured 2 minutes — the glaze is what maintains the aligner’s gloss and transparency through wear. The same flexibility makes it valuable anywhere a rigid glaze would feel wrong.
Advantages of resin stains
- No furnace, no firing cycle.The entire staining process happens at the bench. Apply, cure, done — minutes, not a furnace program. For a lab without a porcelain furnace, or for chairside work, this is the only option.
- Forgiving and reworkable.Made a mistake? Before curing, wipe it off and start over. Even after curing, the layer can be adjusted or stripped mechanically. A fired ceramic stain mistake means re-firing or remaking.
- Unlimited working time.Nothing sets until you cure it. Complex multi-layer characterization can be perfected without racing the material.
- Bonds to what ceramics can’t touch.Printed resins, PMMA, PEEK, composites — none of these survive furnace temperatures. Resin stains are the onlyaesthetic finishing system for the entire polymer restoration category, which is the fastest-growing segment of digital dentistry.
- Speed.From uncharacterized to finished in a single bench session. No furnace scheduling, no cooling waits, no batch constraints.
- Low entry cost.A curing light costs a fraction of a porcelain furnace. A small lab or clinic can offer characterized restorations without capital equipment investment.
Limitations to respect
Resin stains are not a universal substitute. Their wear resistance, while good under a proper glaze, does not match a fused glass layer — on high-wear occlusal surfaces, the glaze protection is mandatory, not optional. They cannot be used on any substrate that will later be fired. And the aesthetic ceiling, while high, doesn’t reach the optical integration of fused glass (more on that below).
Part 2: Low-fusing ceramic stains — color through fire
The glass science underneath
To understand ceramic stains, you need to understand what “fusing” actually means. A ceramic stain is glass powder — silicon dioxide networks doped with metal oxides for color — suspended in an organic paste carrier that burns away early in the firing cycle.
As the furnace ramps up, the glass particles pass through their glass transition temperature and begin to flow. At peak temperature, they melt into a continuous glass film that wets the substrate surface. On cooling, that film solidifies as glass chemically integrated with the ceramic beneath — not a coating on the restoration, but a glass layer welded into it.
This is why the “low-fusing” designation is an engineering achievement, not just a label. The stain glass must melt low enough to fire quickly and safely — but its coefficient of thermal expansion (CTE) must remain compatible with the substrate through the entire cooling cycle. If the stain glass shrinks at a different rate than the zirconia or lithium disilicate beneath it, the result is crazing, cracking, or delamination. Formulating a glass that fuses at 730–800°C and stays CTE-matched to modern ceramics is the core technical challenge these systems solve.
The fluorescence question
Natural teeth fluoresce — under UV-containing light (daylight, some interior lighting), dentin emits a soft blue-white glow from its organic content. It’s subtle, but its absence is conspicuous: a crown without fluorescence looks flat and “dead” in daylight even when its shade matches perfectly under operatory lighting.
Replicating this in a stain system requires doping the glass with rare-earth elements that fluoresce under the same conditions. This is what dedicated fluorescent glazes (like Ceramix’s FP glaze) are for. It’s one of the genuine technical differentiators between a basic stain kit and a complete one — and it’s essentially impossible to replicate convincingly with resin stains, because the fluorescence mechanism needs the glass matrix.
How they work in practice
You apply the stain paste to the ceramic restoration, then fire in a porcelain furnace. The organic carrier burns off early; the glass melts, flows, and fuses at peak temperature; controlled cooling locks in the glass layer.
What they’re for
Ceramic stains are the system for fired restorations:
- Zirconia crowns and bridges— external staining and glazing after sintering
- Glass ceramics(lithium disilicate, press and CAD/CAM) — characterization of pressed or milled restorations
- Cast porcelain— external staining of traditional porcelain-fused work
If the restoration goes through a furnace, the stain should too.
The Ceramix system in detail
Ceramix covers shades G01–G20: the full ceramic characterization range from gingival tones through dentin modifiers to incisal effects, plus dedicated glaze pastes (including a fluorescent glaze for natural light response) and a mixing liquid for viscosity control.
The firing curve is engineered for speed without compromising the fuse:
- Start:400°C
- Ramp:50°C/min
- Peak:800°C for zirconia / 730°C for glass ceramics (press and CAD)
- Hold at peak:2.5–3 minutes
- Total cycle:approximately 15 minutes
The 15-minute cycle deserves attention. Traditional porcelain stain firing ran longer — slower ramps, longer holds — partly from caution, partly from older furnace technology. The engineering here is in proving that a fast ramp with a short hold achieves complete glass flow and CTE-safe cooling for these specific glass formulations. Shorter cycles mean more furnace turns per day, which is pure production economics.
Advantages of ceramic stains
- The bond is the substrate.A fused stain doesn’t sit on the surface — it becomes glass integrated with the ceramic. Nothing to chip, peel, or wear through under normal function. This is the durability benchmark every other stain type is measured against.
- True optical integration.Because the stain layer is glass fused into glass (or onto zirconia), light transmission, reflection, and fluorescence happen throughthe characterized layer — the same physics as natural tooth structure. The aesthetic ceiling is the highest available.
- Firing-stable shades.Once fused, the color is locked. No polymer aging, no water sorption shifting the shade over months. What comes out of the furnace is what the patient wears for years.
- Fluorescence control.As discussed above — the ability to replicate natural dentin fluorescence is a genuine aesthetic capability that resin systems cannot match.
- Production efficiency at scale.Short firing cycles, batch firing (multiple units per cycle), zero manual curing per layer. For a lab firing dozens of units daily, per-unit labor is minimal and the process is highly repeatable.
- Chemical inertness.Fused glass is inert to oral chemistry — acids, enzymes, cleaning agents. No degradation pathway comparable to polymer aging.
Limitations to respect
The furnace is non-negotiable — no furnace, no ceramic stains, which excludes small clinics and chairside workflows entirely. The process is less forgiving: a firing mistake (wrong peak, contamination, thermal shock from too-fast cooling) usually means re-firing or starting over. Shade correction after firing is limited. And ceramic stains are useless on polymers.
Head to head: the full comparison
Dimension | Resin stains (Polyfix) | Low-fusing ceramic stains (Ceramix) |
Fixation chemistry | Photoinitiated polymerization | Glass melting and fusion |
Substrates | Printed resins, PMMA, PEEK, composites, aligners | Zirconia, glass ceramics, cast porcelain |
Equipment needed | Curing light/unit (low cost) | Porcelain furnace (capital investment) |
Working time | Unlimited until cure; minutes per unit | ~15 min firing cycle; batch-capable |
Skill emphasis | Brush control, layering technique | Furnace programming, shade planning before firing |
Reworkability | Wipe off before cure; adjustable after | Re-fire or remake |
Durability | Good under glaze; occlusal wear is the limit | Fused glass; the durability benchmark |
Aesthetic ceiling | Excellent for polymers | Higher — optical integration + fluorescence |
Shade stability | Good; polymer aging is a long-term factor | Locked at firing; no aging pathway |
Per-unit labor (skilled) | Higher — hand layering | Lower at volume — batch firing |
Throughput scaling | Scales with hands | Scales with furnace capacity |
Entry cost | Low | Furnace + training investment |
Shade system | 18 shades + thinner + 2 glazes (21 pc) | G01–G20 + glazes + mixing liquid |
Best lab profile | Digital/print-focused, chairside, small lab | Ceramic production lab, high-aesthetic cases |
When one case needs both
Here’s the scenario that confuses even experienced technicians: a full-arch rehabilitation where the posterior crowns are zirconia (ceramic stains) but the provisional phase — or the printed try-in, or the surgical guide that’s also an aesthetic preview — is polymer (resin stains).
The rule doesn’t change: match the stain to each substrate independently. But the shade planning must be unified. The zirconia definitive and the PMMA provisional need to target the same final shade, which means understanding how each system’s palette renders that shade. This is where having both systems from one manufacturer with coordinated shade logic pays off — and where mixing brands across the two chemistries creates the most headaches.
Part 3: At the bench — workflows that work
Theory gets you to the right system. These workflows get you to a finished restoration.
Polyfix standard workflow (resin stains)
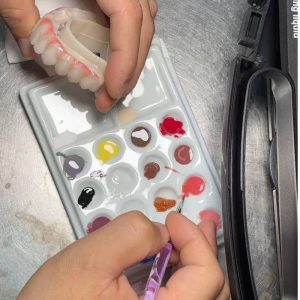
Step 1 — Surface prep. Finish and polish the restoration to its final contour first. Stain goes on a finished surface, not a rough one — surface texture telegraphs through thin stain layers. Clean thoroughly: any polishing compound residue, finger oils, or dust will cause adhesion failure.
Step 2 — Plan the shade map. Before touching a brush, decide the layer sequence. A typical anterior crown: cervical chroma base → body dentin tone → incisal translucency effects → surface texture details (crack lines, white spots) → glaze. Write it down until it’s habit.
Step 3 — Thin and layer. Dispense stains onto a palette. Use R19 thinner to reach the working viscosity for each step — wash consistency for large cervical blends, fine-line consistency for fissures and crack lines. Apply thin. Cure each layer before adding the next. This is where the stratification principle from Part 1 becomes practice: 3–4 thin cured layers always outperform one thick one.
Step 4 — Detail work. Fine brushes for characterization: mamelon effects, incisal halo, cervical stippling. Because each layer is cured independently, you can evaluate and correct as you go.
Step 5 — Glaze. Apply R20 transparent glaze evenly over the entire characterized surface — or R21 soft glaze where flexibility matters (aligners, thin provisionals). This is not optional. The glaze seals the stain, provides the final gloss, and is the wear layer. Final cure.
Step 6 — Check under multiple lights. Operatory light, daylight, and if available, UV-containing light. Metamerism — shades matching under one light and clashing under another — is caught here, not at delivery.
Ceramix standard workflow (ceramic stains)
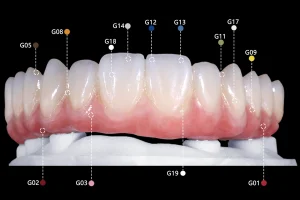
Step 1 — Surface prep. The sintered zirconia or glass-ceramic restoration should be finished to final contour. Steam-clean or ultrasonic-clean: firing bakes contamination permanently into the glass, so the surface must be spotless.
Step 2 — Plan the firing. Decide whether characterization and glaze happen in one firing or two. One firing is faster; separate glaze firing gives more control over the final surface. For high-aesthetic anterior work, two firings are worth the time.
Step 3 — Apply the stain paste. Use the mixing liquid to reach working consistency. Apply with ceramic brushes — the paste should flow smoothly without dragging. Remember: the fired result is thinner and more translucent than the wet paste looks, so apply with that transformation in mind. Experience teaches the translation; test-fires on shade tabs accelerate it.
Step 4 — Fire. Load per the validated curve: 400°C start, 50°C/min ramp, 800°C peak for zirconia (730°C for glass ceramics), 2.5–3 minute hold. Don’t rush the cooling — thermal shock is a real failure mode even with a perfect peak.
Step 5 — Evaluate and correct. Assess shade under multiple lights. Minor corrections can be added and re-fired. Major misses usually mean stripping back and starting the stain application over — which is why Step 2 planning matters.
Step 6 — Glaze fire. Apply the glaze paste (standard or fluorescent, per the case) and fire. The glaze is what creates the final surface smoothness and optical depth.
Troubleshooting: what went wrong and why
Symptom | Likely cause | Fix |
Stain looks chalky/opaque (resin) | Applied too thick; not thinned enough | Strip back, re-apply in thinner layers with R19 |
Stain peels or lifts (resin) | Surface contamination before application | Re-prep surface, clean thoroughly, re-apply |
Color too intense | Over-application; wrong shade concentration | Thin more aggressively; build intensity gradually across layers |
Glaze pools or runs | Too much material; held at wrong angle during application | Apply less, keep the restoration oriented so gravity works with you |
Pinholes in fired glaze (ceramic) | Air trapped under paste; paste too thick | thinner application; ensure even wetting before firing |
Shade shifted after firing (ceramic) | Wrong peak temperature; furnace contamination | Verify curve with test fire; clean furnace muffle |
Cracks in fired stain layer (ceramic) | Cooling too fast (thermal shock) | Respect the cooling phase; don’t open the furnace early |
Shade matches in operatory, clashes in daylight | Metamerism; checked under only one light source | Always evaluate under at least two light types before delivery |
Gingival characterization looks flat (denture) | Single pink, no layering | Layer 2–3 pink/red tones: deeper in sulcus areas, lighter on ridge crests |
Walkthrough: a single A2 zirconia crown, start to finish
A patient needs a single central incisor crown, shade A2, on a zirconia coping. Here’s how the decisions flow:
- System choice:Zirconia goes into a furnace → Ceramix. No debate.
- Shade planning:A2 body means a warm, medium-value dentin base. Plan: dentin-base stain for the body, subtle cervical chroma (the neck is always warmer than the shade tab suggests), incisal translucency with a cool modifier, and a fluorescent glaze — anterior teeth need fluorescence or they look dead in daylight.
- Application:Body stain first, blended thin. Cervical warmth added as a wash, not a line — real necks gradient, they don’t stripe. Incisal effects kept subtle; overdone translucency reads as gray.
- Fire:Standard curve, 800°C peak. Cool properly.
- Evaluate:Check against the A2 tab under operatory light and Check fluorescence under UV-containing light. Adjust with a second stain fire if needed — small corrections only.
- Glaze fire:Fluorescent glaze, thin and even. Final check.
Total active hands-on time: under 30 minutes across two firings. The planning (steps 2–3) is where the result is actually determined — the furnace just executes.
The mistakes that cost money
Firing a resin stain. A technician accustomed to ceramic workflows puts a resin-stained unit in the furnace. The resin matrix burns out, the pigment chars, the restoration is ruined. This happens more often than anyone admits during lab cross-training.
Using ceramic stain on a polymer. The stain never bonds — no heat, no fusion, and the substrate can’t take heat. The paste sits on the surface and washes off. Wasted material and wasted chair time.
Skipping the glaze on resin stains. The stain layer without its protective glaze (R20) is exposed to abrasion and chemistry. The five minutes for the glaze coat is the cheapest insurance in the workflow.
One thick layer instead of stratified thin layers. With resin stains, impatience is the enemy. A thick layer under-cures at depth, looks flat, and fails early. Three thin cured layers always beat one thick one.
Wrong shade logic across systems. R-numbers (Polyfix) and G-numbers (Ceramix) are independent palettes. Don’t assume R03 equals G03. Plan each substrate’s shade within its own system.
Cooling too fast after ceramic firing. Thermal shock cracks the glass layer even when the peak was perfect. Respect the cooling phase — it’s part of the firing curve, not dead time.
How to choose: the decision framework
First question: does this restoration go into a furnace?
- No(printed resin, PMMA, PEEK, composite, aligner) → resin stains. Light-cure, bench workflow, glaze to finish.
- Yes(zirconia, glass ceramic, cast porcelain) → low-fusing ceramic stains. Fire it, fuse it, done.
Second question: what kind of lab are you?
- Digital/print-focused or chairside, no furnace→ resin stains are your complete solution. They cover everything you produce.
- Ceramic production lab→ ceramic stains are your core system. Add resin stains when you take on printed or PMMA work (and you will — the digital workflow keeps expanding the polymer side).
- Full-service lab doing both→ you need both systems. Budget for it; trying to stretch one chemistry across both substrate families is where the expensive mistakes happen.
Most modern labs are converging on the third profile. The digital workflow produces polymer restorations (models, temps, printed crowns, aligners) and ceramic restorations (zirconia, glass ceramic) side by side, often for the same patient. One stain system can’t cover both chemistries — that’s not a sales pitch, it’s materials science.
Frequently asked questions
Can I use ceramic stains on 3D printed crowns?
No. Ceramic stains need furnace heat to fuse, and printed resin crowns are destroyed by that heat. Use light-cure resin stains (like Polyfix) on any printed, milled PMMA, or PEEK restoration.
Why did my stain change color after firing?
The most common causes are a wrong peak temperature or furnace contamination. Verify your firing curve with a test fire, and make sure the muffle is clean — residue from previous firings can shift shades.
How do I choose between resin and ceramic stains?
Ask whether the restoration goes into a furnace. Polymer restorations (printed resin, PMMA, PEEK) need resin stains; fired restorations (zirconia, glass ceramic) need ceramic stains. Most full-service labs need both.
Do I need a furnace for dental staining?
Only for ceramic stains. Resin stain systems cure with a standard dental curing light — no furnace required — which makes them the practical choice for chairside work and labs without porcelain furnaces.
How long do dental stains last on the restoration?
Fused ceramic stains are permanent — the color is locked into glass. Resin stains last well under a proper glaze layer but will wear faster on high-friction occlusal surfaces; the protective glaze (R20) is what determines their service life.
What is the difference between Polyfix and Ceramix?
Polyfix is a light-cure resin stain system (18 shades + thinner + 2 glazes) for polymer substrates — no furnace needed. Ceramix is a low-fusing ceramic stain system (G01–G20) for zirconia and glass ceramics — fired at 800°C/730°C in about 15 minutes.
Related reading
- Polyfix vs Ceramix: Which Stain System Does Your Lab Need?
- From Scan to Seat: The Complete Dental 3D Printing Materials List
- Polyfix Stain Kit — full specifications
- Ceramix Stain Kit — full specifications
Setting up or expanding your lab’s staining workflow? Browse the full PRS ecosystem or talk to our team about distributor partnerships.